This is a collection of some of the things I've written about, recently. I am a perpetual tinker, and most of the things that I find the energy to write about are in that vein of things. This is Not a Writer's Log, but a Tinker's Notebook.
true
{{blog::edited}}
The Ballad of #14 Coiler
Published on 09/02/2025 |
Recently at work we had a 5-axis coiling machine develop a series of issues, some strange and some not-so-strange. First, the ballnut assembly for the Forming-2 axis wore out and broke. Not a strange issue, but one we were under-prepared for. Preferably in this situation, we'd grab a spare ballscrew with ballnut already installed, and swap the whole assembly out. Then the used assembly can be taken back to the shop, examined for wear and either rebuilt or scrapped. It just so happens, however, that we had already used up our stash of OEM assemblies, and this particular assembly is difficult to obtain off-the-shelf.
The spare ballnuts we ordered are sized correctly in the most important dimensions (major and minor diameter, pitch, etc) to be used in a pinch, but they differ from the OEM ballnuts in a few crucial ways. Notably, The originals are single-nut assemblies with a single recirculating tube, and plastic seals on both ends. The replacements are the upper half of double-nut assemblies, use two recirculating tubes per nut, have a plastic seal only on one end, and are about 10mm longer than the originals. Oh, and they arrived assembled onto ballscrews with about 8 inches too much of thread and a keyed shaft end with dimensions all wrong for our use. So while they can be used, it takes a lot of attention to detail, and a lot of patience.
Our first shift techs got the busted assembly off the machine, and started working on putting together a new one. Unfortunately, in the process of trying to put it together, they managed to lose some of the ball bearings, and the whole thing stopped working so well. Deciding that uptime is more important than The Right Way™, an executive decision was made, and they pulled the same assembly off of another coiler that wasn't currently being used. So, for the next week or so, that axis worked fine. Meanwhile, I spent a day prepping two more ballscrew assemblies (one for the other coiler, and one as a spare).
Fast forward a few days, and I come in to find that the machine is down again for a different axis! At this point, I was informed that the machine was throwing alarms on the HMI for Forming-2 and making a grinding noise on Forming-1. First shift was in the middle of replacing the servo motor on Forming-1. They couldn't get it to fit back in and had taken to trying to hammer it into place. One broken mounting tab later, I pulled the servo back off to find that the original key had never been removed, so the new servo (with new key pre-installed) was just hung up on that.
We pulled the old key out, greased everything up, et voila! It fit just fine. Only, after putting it all back together and turning everything on, the machine continued to throw different alarms for Forming-1! So I went through a day of continuing to track down different possible issues with a support staffer, an engineer, and the production manager. Sometimes we'd jog it really slowly and get an Overcurrent alarm. Sometimes we'd jog it really slowly and get an encounter alarm. Sometimes it'd just come up from powered-off and give us both without having moved!
We have a reset procedure for these kinds of issues, so we'd have to walk around back to the cabinet and clear everything out, then power the machine off and power it back on and try to look for something new. This went on for the rest of the day until I'd been there way too long and turned it over to 2nd shift.
Eventually the next day rolled around, and I came in to find that the issue had been 'resolved' by the support staffer. Only, he wasn't really sure what he did, but the machine was running! Apparently there was some laptop-to-PLC connecting done, but no one had any idea what had changed. So I kept an eye on it, but the machine kept running for a while, so we called it for the time being.
The following day, I came in to find that the issue had come back! So we continued through the cycle of trying to swap different parts out and order things differently to see if the alarm could be made to move.
At this point, I should note that we'd had a similar issue about a year ago on a different coiler. What we figured out before is that the crossover cables Fuji supplies for SX-Bus equipment don't play nicely with dust and physical stress. Back then, after a few days of fighting to get the machine to work, we determined that the SX-Bus cable to the cut axis was busted. After cutting and crimping a replacement crossover cable, that coiler went back to churning out parts with few issues since. So it's with that in the back of my mind that I had started thinking about different ways I could maybe reproduce the issue we were currently experiencing with #14 coiler to the SX-Bus cables.
At first I grabbed our little cable continuity tester, and it showed that the OEM cables on #14 had the correct pinout and good continuity. I checked all of them (including some that weren't OEM) and we came to the conclusion that since some would only show continuity across a couple of pins, we must have some bad cables. I cut and crimped several replacements, but somehow managed to make about a dozen cables that all tested bad in the same way. Assuming that they were probably okay and the tester was somehow not working, I came back the next day with my personal crimpers and fittings, and made another cable only to find that it too tested bad. But after swapping it with a cable on a coiler that was known to work, it didn't change any behavior, so I wrote the cable tester off as kinda useless for crossover cables. I put all the cables back together, and set off to check other potential issues.
Around this time, we noticed some specific behaviors that started to make a little more sense. On startup, if the machine did not immediately alarm out for Forming-1, we could try jogging that axis back and forth slowly. If you moved the pulse wheel a few clicks, the motor would move one or two pulses, then stop. If you moved it some more, the position output on the HMI would change, but the motor would be motionless. Eventually the motor would quickly jump from its cerrent position to the newly commanded position, and then the HMI would alarm out.
We assumed from seeing that and noting the pulse wheel cable jacket was pretty frayed, maybe there was some sort of issue with the pulse wheel. We didn't have a spare, so I pulled one from another known-good coiler and installed it onto #14 coiler. After that, everything started to move normally again, and no alarms! I watched for a while, and the only other change observed was a direction swap that we assumed was due to an undocumented label swap across a couple of terminals on the panel. After swapping the + and - cables around, it moved in the correct direction.
The problem returned some time in the following days while I was cutting out the damaged section of cable on the used pulse wheel so it could be installed on the known-good coiler we were borrowing parts from. Back at it again with myself, the engineer, production manager, and support staffer, we were collectively kind of lost. By now the motor, gearbox, ballnut and shaft, Forming-1 servo drive and all associated cables had been changed and moved multiple times with no resolution.
And then it occurred to me. We had tried swapping the drives around with the cables in their original positions, but no one had tried changing the order of the drives in the SX-Bus daisy chain. So while the support staffer was continuing to dig around in the front cabinet, I took some time to try reordering things in the servo drive cabinet. Lo and behold, after swapping the order of SX-Bus cables between Forming-1 and Forming-2, the alarms continued on the HMI, but moved to the "new" Forming-1 servo drive! After resetting the machine and confirming that, the partially formed explanation dawned on me, and I grabbed the cable linking the cut axis and Forming-1 and gave it a little wiggle. Forming-1 alarmed out again! The support staffer thought it was the cable, but I was sure it couldn't be, and rushed off to go find a spare servo drive for the cut axis. After about a half of searching, eventually I found one in a box way out from it's location in the inventory system, I rushed back to test out my theory.
And it worked! With some follow up testing, I confirmed that the "output" port on the cut axis servo drive was dropping out any time the cable jot moved during operation, causing the next servo drive in line to lose communication with the devices upstream, and throat an alarm. I'm not quite familiar enough with SX-Bus to understand why that didn't show up with all of the downstream devices, but ultimately the machine was up again and we had a reproducible explanation for the problem.
TL;DR: For any communication system between two points, the issue could be on the sender, medium, or receiver. If you've exhausted all the ways the medium and receiver could be bad, that pretty much just leaves the sender.
true
true
GM Infotainment Console Blues
Published on 11/18/2022, Edited on November 24, 2022 |
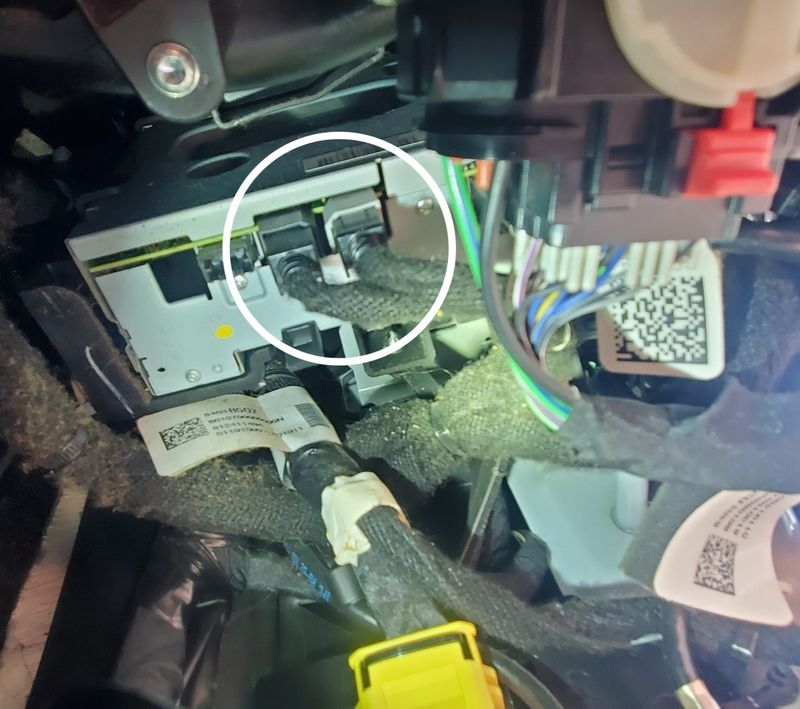
TL;DR There's a specific cable bundle to try reseating if the infotainment console on your truck stops working.
I recently installed a dashcam in a 2019 Chevrolet Silverado 1500. The hardwiring went fine, up until the point I tried to tuck and tidy the 3 wire kit behind a panel under the passenger side dash - at which point the screen for the infotainment system lost its display, the podcast I was listening to stopped, and I could no longer get it to respond to any inputs.
I tried "resetting" the console through various button presses. Does this ever work for anyone?. No combo seemed to work. I tried pulling the relevant fuses (INFO1 and INFO2), but neither resolved the issue. The screen continued to flicker between nothing and a blank black panel, occasionally a strange vignetted grey/white vertically split pattern I lovingly refer to as "Frustration Grey." Eventually, while checking through to see if I had yanked any cable bundles loose, I determined that one of two bundles in the picture below was loosely seated in its socket. Pushing on it seemed to resolve the display issue. Tugging on it slightly (without removing it from its seat) caused the screen to black out. I pushed it back into its seat and have had a working infotainment console since!
In summary, here are the things I have learned:
The INFO2 fuse covers the control lights and blower for the dash AC/heater equipment
The INFO1 fuse covers the actual infotainment touchscreen
The wire bundles seen above must be firmly seated under the passenger side fuse box, and may be prone to coming loose, based on other people's seemingly inexplicable issues with their console suddenly not functioning.
true
true
Tomato Sauce
Published on 02/20/2024, Edited on February 19, 2024 |
This recipe is a simple tomato sauce that I use for pasta.
Ingredients
1x 28 oz can of Cento San Marzano peeled tomatoes
1x 6oz can of tomato paste
5x cloves of garlic
1x large yellow onion
butter
olive oil
salt
pepper
Italian seasoning (~1/3 oz)
crushed red pepper
sugar
lemon juice
Directions
Add 1 tablespoon of olive oil and 1 tablespoon of butter to a pan on medium-high heat. Finely dice a large yellow onion and sauté until translucent. Reduce the heat to low, and add the tomatoes and tomato paste. Mash the tomatoes and mix until smooth. Mince the garlic and add to the sauce. Add 2 tablespoons of olive oil, and a spritz of lemon juice. Add salt, pepper, crushed red pepper, and sugar to taste. Mix again, and simmer over low heat for 30 minutes or until desired thickness.
true
{{blog::edited}}
Wireguard VPN
Published on 02/17/2021 |
I had some more free time and an extra VPS not doing much, so I spent a few minutes setting up a Wireguard VPN, mostly by following a mixture of the official documents' quickstart instructions, and the instruction listed here.
Things that did not immediately occur to me and required some thought:
Your VPN_IP as listed in the Server Side Up instructions is whatever you want to set it as. (Assumption is that you have some internal architecture/allocation structure, if you're setting this all up by hand for small batches of clients.)
If you change the server config (wg0.conf) with the interface up, then restart it, it will likely overwrite whatever changes you just made. Shut the interface down first. before you make changes, then bring it back up.
It's easy to get your private and public keys for the server and clients mixed up - when generating keys, make sure you keep things well segregated and well labeled.
true
true
Understanding Vapid Conditionals
Published on 05/01/2022, Edited on November 24, 2022 |
In Vapid CMS, content can be hidden or displayed through a pair of conditionals (if/unless). The documentation provides a brief example of a conditional weather alert, if such a thing were entered.
I have elected to make use of this functionality for this blog. Since I want to be able to draft posts in the browser, without necessarily publishing them immediately, I need some sort of conditional for posts. Here is how the blog was templated originally.
There are two major changes. Firstly, interior of the `blog` section was wrapped in an if statement. Secondly, the conditional (`published`) was given the type of `choice`. By default, Vapid creates a checkbox that functions as a simple boolean. Checked, and the value of `published` becomes true. Unchecked, and it remains false.
In the near future, I may try to expand my use of this conditional system to create a sort of ad-hoc preview space for drafted posts. As Vapid is no longer being maintained, and a preview function is not specifically included in the core tool, there is no standard way to view a draft without saving it and potentially pushing unfinished content out into the world.
EDIT: As of 11/24/2022, I've made some further adjustments to how this blog is templated. These include moving the permalink out of the title, adding a conditional display of the "edited on" date, and adjusting the ordering system for posts.
I am somewhat prone to distraction and hyper-fixation on a given thing, especially when that thing scratches my brain in just the right way. In order to spend less time hunched over a keyboard and more time hunched over tile-work, I wrote a short program to list out start and stop times for a 2 hour Pomodoro.
The idea is pretty straightforward: work 25 minutes, break 5 minutes. Rinse and repeat. It's usually recommended that after 4 cycles or so, you take a long (30 minute) break. Since I'm trying to spend less time goofing off, I've decided to forego the extra junk people add on or alter for productivity reasons. Just 25 minutes of doing, and 5 minutes of not doing.
But that's not the important part. This is:
// My Use Case
time_t init = time(NULL);
struct tm tmp = *localtime(&init);
Google "C89 time.h example" and you'll get a lot of examples along these lines, with one minor difference.
// Example Use Case
time_t init = time(NULL);
struct tm *tmp = localtime(&init);
Spot the difference? The gist here is that I am not very literate in C, and often misunderstand the semantics of pointers and copying them around.
This doesn't work the way I had initially expected, because in my illiteracy, I had not realized that `startTime` and `breakTime` pointed to the sample place, as demonstrated by something like this:
And now it works as expected. the output from compiling and running `timer.c` is a nice little list of times to start and stop working for the next two hours. On its own it's not particularly useful unless you have the discipline to know when to stop and start. Since I'm easily distracted, the next logical step is to feed that list of times and a pair of start/stop scripts to `cron` to enforce the workflow...
true
{{blog::edited}}
Datalogging on a Woodstove
Published on 03/29/2021 |
Baby Steps
By request, I have been putting together a logging and notification system for a Woodmaster wood burning stove. This has turned out to be a relatively straightforward task, though there have been a few initial hiccups. There are plenty of off-the-shelf data logging solutions that would work without much fuss, but I feel that this is an excellent opportunity to get familiar with the IoT tools I have laying around.
This particular stove was initially equipped with a Dixell XR30C temperature controller, which is pretty straightforward to set up and use, but lacks the ability to communicate with my monitoring system directly. Fortunately, the XR30CX is pretty much a drop-in replacement (Pinout is the same, control face is different but similar) and features the ability to communicate via Modbus-RTU. To facilitate this, the device needs an XJ485CX serial interface. This gets us halfway there. Connect this two wire RS-485 serial interface to a $5 USB RS-485 serial interface, and we're there! Now the device can speak to pretty much anything with a USB port. For this stove, I've installed a Raspberry Pi 3 Model B.
The stove itself doesn't offer a ready solution to power the pi, so I clipped the mains power circuit for the temperature controller and attached a 120v plug in parallel. Hacky, sure, but there's enough lee-way in the power here for a 2.5a Raspberry Pi power supply. It's crucial that the power supply be able to put out enough power, as initial testing with a cheaper power-supply led to failures of the USB. If your serial interface draws more power than your pi can supply, the Pi's OS may shut off access to the USB entirely. Now that everything is wired up, the stove's control panel can be screwed back into place. Fortunately, this does not seem to affect the Pi's ability to communicate over wifi. This stove sits approximately 150 feet from the nearest access point, so while it is not particularly fast, it is generally more than sufficient for my needs.
At this point, you can test the Pi and Temperature Controller's ability to communicate. I have leveraged pymodbus extensively, which comes with a handy REPL for interacting with RS-485 devices.
pymodbus.console serial --port="/dev/ttyUSB0"
client.read_holding_register unit=42 address=256
Assuming everything works, this will return the temperature reported from Probe 1 on the stove.
true
{{blog::edited}}
I Am Internet Archive And So Can You
Published on 03/10/2023 |
Want to build a local copy of a cool occult informational website that you're afraid won't be around forever? Try wget!
Published on 12/03/2023, Edited on December 25, 2023 |
Everybody knows backups are important, but not everybody thinks to include relevant metadata in those backups. One particular instance where this stands out is in paper copies of sensitive information. A paranoid teenage computer enthusiast in 2013 might be tempted to, say, write down various bits of important information on a piece of paper eg bitcoin wallet seeds, hand-rolled password manager master keys, revocation certificates, et cetera. (The important things!)
The point is, often times, these bits of information may be themselves self evident in some way. Bitcoin wallet seeds are generally conformant to BIP39, and are therefore somewhat recognizable. Messages signed or encrypted via gpg generally include headers and footers that make them recognizable, even if the actual contents are just an ascii-armored random blob. These things are generally well documented, and recovering the important information is well understood. Stripping off metadata unnecessarily might cause your tools to stop working, or worse, leave you with no way to even know what you're working with in the event your memory fails you. 10 years is a long time. Do you think you can remember all the little details of whatever bizarre scheme you cooked up in the middle of the night to obfuscate what ought to be a simple plaintext note for yourself?
The point is, obfuscation isn't strictly necessary in the presence of strong crypto, under most circumstances. Obfuscation is likely to leave you scratching your head and wondering if the piece of paper you're staring at is the seed phrase for a fat bitcoin wallet or just some random nonsense you dreamed up in a fit of paranoia. And, since modern cryptography is quite good, you'll almost certainly never know. If you find yourself making hard copies of important information, you should include information about what that information is, and how to use it.
Maybe you'll get married and find yourself wondering whether you spouse is going to be able to get into your utility accounts in the untimely event of your death. For now, this is often resolveable with a copy of a death certificate, but under an uncertain future where people are increasingly beholden to automated systems, you (or your hypothetically widow) might need access to secrets that (if poorly stored) are entirely unrecoverable. Consider backing up your password manager db / secrets-share / whatever, and leaving detailed notes about how to use it.
Really, this boils down a bigger-picture issue of ignoring the entire life-cycle of important information. When you start storing secrets, you need to consider more than just the initial requirements (password criteria, key length, etc). You need to consider how you plan to use that secret, how you might need to alter it, how you might need to share it with someone, even how you or a hypothetical second actor might need to recover that secret (if you lose your memory, or your life).
true
{{blog::edited}}
You Are The Weakest Link. Goodbye.
Published on 01/04/2022 |
As of commit 5294ffb, Vapid is no longer maintained. Which is an unfortunate surprise for me, as this blog is self-hosted using Vapid, and most of the time I have spent on it was post-commit. I had no idea until today.
According to the CMS's README, "This repository is no longer maintained. Issues and pull requests will no longer be answered or approved. The repository will remain read-only though, so that users can fork and use elsewhere. Thank you for a good run."
So in the meantime, I'll be maintaining a fork for my own sake, and hunting down alternatives. The core criteria that drew me to Vapid in the first place are its relative simplicity, consistency in construction, and the incredible flexibility of the template system upon which Vapid is built. There are a handful of template tags that give me some basic editorial consistency throughout the site. These tags provide some semantic structure to the content. The presentation of that content is more or less built using the kinds of tools you might expect to use when working on a static site generator, but once the structure of the website itself is established, adding more content is trivially done through the automagically generated dashboard.
This blog, for example, is just built out of a couple of template tags and a layout template. All the content is added after the fact, through the dashboard. I am absolutely in love with this kind of minimal middle ground, somewhere between the kitchen sink WordPress and a tiny little static site generator. (I have a historical love affair with werc that has left an unmistakable mark on my aesthetic preferences regarding the web.)
While I'm climbing down the gradient of locating a suitable replacement for Vapid (or compelling myself to start hacking on what's available), I'll also be adding research into content aggregation and automated curation processes to help quell my addiction to socially-driven content aggregation. I strongly suspect that if I can narrow down a few of the metrics that define how I judge information worth reading through, I can generate an aggregation feed for my own perusal (and stop refreshing r/popular every few minutes.)
true
true
It's Alive!
Published on 01/08/2021, Edited on November 24, 2022 |
I had the day off due to inclement weather, so I decided to do some stretching, and spend a little bit of time working on my website. After some initial confusion, I now have a roughly functional blog up and running atop Vapid, my CMS of choice.
EDIT: See this post for an update regarding the discontinuation of support for Vapid. As of 11/24/22, I am still using Vapid to run this website. Despite the lack of some features of comfort, it is a nice consolation to know that it's not going to suddenly change.